| Lesson 4 | Configuring an NFS server |
| Objective | Configure an NFS server. |
Configuring Red Hat NFS Server
By default, Red Hat Linux supports NFS:
Because Red Hat Linux starts the necessary servers, you only need to configure the exported filesystems. The
To configure the exported filesystems, open
- Red Hat supplies precompiled NFS modules for the Linux kernel, which the kernel loads when you mount a NFS filesystem.
- Red Hat Linux starts
portmapautomatically at boot. - If you configure your network information, then Red Hat Linux automatically starts the NFS server daemons
rpc.mountdandrpc.nfsdat boot.
Because Red Hat Linux starts the necessary servers, you only need to configure the exported filesystems. The
/etc/exports file describes exported filesystems, including access permissions and read/write privileges. To configure the exported filesystems, open
/etc/exports in your favorite editor.
Steps to configure Red Hat NFS Server
Configuring a Red Hat NFS Server involves several critical steps, each requiring precise execution. This guide is tailored for a Red Hat System Administrator and assumes a basic understanding of Linux systems and network configurations.
Adhering strictly to these steps will ensure a robust and efficient NFS server setup on a Red Hat system. Regular updates and security checks are vital to maintain the integrity and performance of the NFS server.
- Installation of NFS Packages:
- Begin by installing the necessary NFS packages. Execute the following command:
sudo yum install nfs-utils nfs-utils-lib
- Once installed, enable and start the NFS service:
sudo systemctl enable nfs-server
sudo systemctl start nfs-server
- Begin by installing the necessary NFS packages. Execute the following command:
- Configuring the NFS Exports:
- Edit the `/etc/exports` file to define the directories to be shared over NFS and their access permissions. For example:
/shared_directory 192.168.1.0/24(rw,sync,no_subtree_check)
This line shares `/shared_directory` with the 192.168.1.0/24 network, granting read-write permissions.
- Edit the `/etc/exports` file to define the directories to be shared over NFS and their access permissions. For example:
- Export the Shared Directories:
- After configuring the exports, apply the changes by running:
sudo exportfs -ra
- This command refreshes the export table.
- After configuring the exports, apply the changes by running:
- Adjusting Firewall Settings:
- Modify the firewall settings to allow NFS traffic. For instance:
sudo firewall-cmd --permanent --add-service=nfs
sudo firewall-cmd --permanent --add-service=mountd
sudo firewall-cmd --permanent --add-service=rpc-bind
sudo firewall-cmd --reload
- This ensures NFS services can communicate through the firewall.
- Modify the firewall settings to allow NFS traffic. For instance:
- Setting Up NFS Client Access (Optional):
- On client machines, install NFS utilities:
sudo yum install nfs-utils
- Mount the NFS share from the server, e.g.:
sudo mount -t nfs 192.168.1.100:/shared_directory /local_mount_point
Replace `192.168.1.100` with your NFS server's IP and adjust the directory paths as needed.
- On client machines, install NFS utilities:
- Ensuring Secure NFS Communication (Optional):
- For enhanced security, consider configuring Kerberos for NFS. This requires setting up a Kerberos server and creating appropriate principals for NFS.
- Regular Maintenance and Monitoring:
- Regularly check the NFS server status with:
sudo systemctl status nfs-server
- Monitor `/var/log/messages` for any unusual activities or errors related to NFS.
- Regularly check the NFS server status with:
- Backup and Disaster Recovery:
- Regularly back up your NFS server configuration and shared data.
- Have a disaster recovery plan in place in case of server failure or data loss.
Adhering strictly to these steps will ensure a robust and efficient NFS server setup on a Red Hat system. Regular updates and security checks are vital to maintain the integrity and performance of the NFS server.
The /etc/exports File
Regardless of how you edit
The following diagram illustrates the general format of
/etc/exports, you should be familiar with its layout.
One day, you might want to look through the file to make sure it's exporting only those filesystems you want publicly available. The following diagram illustrates the general format of
/etc/exports.
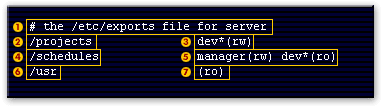
- Comments start with a hash (#) mark and instruct NFS to ignore all text to the end of the line. The comment indicates that you are working with the /etc/exports file on the server compute.
- The first field specifies the filesystem to export. In this case, NFS exports all files in the server's /projects filesystem.
- The second field lists the authorized hosts and access methods for the filesystem in the first field. In this case, all hosts whose name starts with dev will gain read/write access. Hosts named dev1, developer, devnull, and devil will all match this specification and gain read/write access to /projects
- The first field specifies the filesystem to export. In this case, NFS exports all files in the server's /schedules filesystem.
- The second field lists the authorized hosts and access methods for the filesystem in the first field. In this case, two host match. First, any host named manager will gain read/write access to /schedules. Second, all hosts whose name starts with the dev will gain read only access host named dev1, developer dev null and devil will all match this the specification and gain read only access to schedule.
- The first field specifies the filesystem to export. in this case, NFS exports all files in the server's /user filesystem.
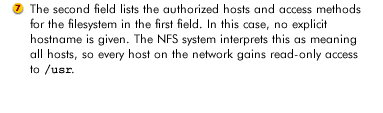
- The second field lists the authorized hosts and access methods for the filesystem in the first field. In this case no explicit host name is given. The NFS system interprets this as meaning all hosts so every host on the network gains readonly access to /user
/etc/exports File Configuration File
The /etc/exports file controls which file systems are exported to remote hosts and specifies options. Blank lines are ignored, comments can be made by starting a line with the hash mark (#), and long lines can be wrapped with a backslash (\). Each exported file system should be on its own individual line, and any lists of authorized hosts placed after an exported file system must be separated by space characters. Options for each of the hosts must be placed in parentheses directly after the host identifier, without any spaces separating the host and the first parenthesis. Valid host types are gss/krb5, gss/krb5i, and gss/krb5p.
A line for an exported file system has the following structure:
< export> < host1> (< options> ) < hostN > (< options> )...
In this structure, replace <export> with the directory being exported, replace <host1> with the host or network to which the export is being shared, and replace <options> with the options for that host or network. Additional hosts can be specified in a space separated list.
The following methods can be used to specify host names:
- single host: Where one particular host is specified with a fully qualified domain name, hostname, or IP address.
- wildcards: Where a * or ? character is used to take into account a grouping of fully qualified domain names that match a particular string of letters. Wildcards should not be used with IP addresses; however, it is possible for them to work accidentally if reverse DNS lookups fail. Be careful when using wildcards with fully qualified domain names, as they tend to be more exact than expected. For example, the use of *.example.com as a wildcard allows sales.example.com to access an exported file system, but not bob.sales.example.com. To match both possibilities both *.example.com and *.*.example.com must be specified.
- IP networks: Allows the matching of hosts based on their IP addresses within a larger network. For example, 192.168.0.0/28 allows the first 16 IP addresses, from 192.168.0.0 to 192.168.0.15, to access the exported file system, but not 192.168.0.16 and higher.
- netgroups: Permits an NIS netgroup name, written as @ <group-name> , to be used. This effectively puts the NIS server in charge of access control for this exported file system, where users can be added and removed from an NIS group without affecting /etc/exports.
Diagram of the /etc/exports file
- Comments start with a hash # mark and instruct NFS to ignore all text to the end of the line. This comment indicates that you are working with the /etc/exports file on the server computer.
- The first field specifies the filesystem to export. In this case, NFS exports all files in the server's /projects filesystem.
- The second field lists the authorized hosts and access methods for the filesystem in the first field. In this case, all hosts whose name starts with dev will gain read/write access. Hosts named dev1, developer, devnull, and devil will all match this specification and gain read/write access to /projects.
In this case no explicit host name is given. The NFS system interprets this as meaning all hosts so every host on the network gains readonly access to /user
Working with exported Filesystems
The
In the next lesson, you will learn about NFS security issues.
exportfs command is the general tool for working with exported filesystems. You will most often use exportfs in one of four ways:
- To notify the NFS system you made changes to
/etc/exports. Once you have changed your exported filesystems, runexportfs -r
to incorporate them. - To unexport[1] (disconnect an exported filesystem) all filesystems listed in
/etc/exports. You might want to unexport the filesystems if you discover a security breach or are running diagnostics. To do so, runexportfs -ua. - To export all filesystems, which you might need after you've unexported them all. Use
exportfs -ato export all filesystems. - To show all exported filesystems. Use
exportfs -vto list filesystems that are currently exported.
Configuring Nfs Server - Exercise
Before moving on to the next lesson, click the Exercise link below to practice configuring an NFS server.
Configuring Nfs Server - Exercise
Configuring Nfs Server - Exercise
[1]Unexport: The opposite of exporting. A jargon term meaning to make a previously exported NFS filesystem unavailable.